|
|
DCEmu Reviews is a site which has reviews and more for every console released and so much more. Part of the DCEmu Homebrew & Gaming Network.
Contact us to do reviews Here
THE LATEST NEWS BELOW
|
November 15th, 2007, 14:35 Posted By: bandit
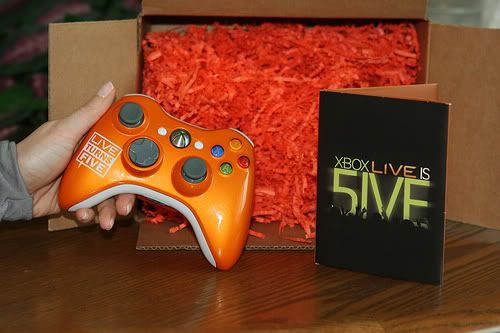
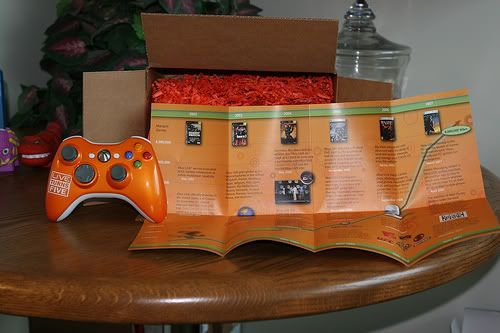
To celebrate 5 years of Xbox Live, Microsoft has created a special, well special colored, Xbox 360 controllers intended for some of the gaming press. The controller includes a Live brochure which has a timeline look to it. More pictures are available via source.
Source: Flickr
To read more of the post and Download, click here!
 Join In and Discuss Here Join In and Discuss Here
Submit News and Releases Here and Contact Us for Reviews and Advertising Here |
|
 |
|
|
|
November 13th, 2007, 05:16 Posted By: bandit
Overline Gaming is claiming that their "The Shaft" is the only arcade joystick for Nintendo Wii Virtual Console games. The joystick features a customizable turbo function that allows you to program individual buttons to be turbo while leaving others to work as normal. It has a full 360 degree range of motion that works with both digital and analog stick games. 8 Locking points for great response in fighting games. It also comes with a 10-Year Warranty and is available in 3 colors; white, pink and black.
Item retails for $39.99 each or 2 for $69.95 and will start shipping in mid-December.
  
Source: The Shaft
To read more of the post and Download, click here!
 Join In and Discuss Here Join In and Discuss Here
Submit News and Releases Here and Contact Us for Reviews and Advertising Here |
|
 |
|
|
|
November 11th, 2007, 23:27 Posted By: bandit
D2CKey Wii Modchip (D2C only)
Manufacturer: D2CKey (aka WiiKey)
Site: Buy from OzModChips
Price: $60.00 ($64.90 AUD)

Overview : D2CKey is the worlds first Wii modchip that is compatible with D2C consoles. D2C is the name of the chipset that the Wii modchips need to exploit in order to work. Before D2C it was a lot easier to mod a console as there was a massive security flaw left open by 'the Big N'. They have now closed this flaw, and for 2 months, people with D2C console had to sit there with their thumbs in their mouths. That is until the D2CKey team (a spinoff of WiiKey) figured it out. If you know WiiKey, you know that they are perfectionists, and don't bring out hardware that isn't perfect.
Many people think it is a curse to get a D2C console, but with the D2CKey, you actually might be the lucky one. The modchip features an Actel chip, which is known for its reliable and stealth features.
Access control LEDs- LED 1: disc access indicator.
- LED 2: data patching indicator
- Flashes smoothly during disc insertion and detection
- Lit when backup is detected (after disclogin)
- Off when original is detected
DVD media compatibility- DVD+-R
- DVD+-RW
- Dual-layer DVD (movies and GCOS)
Game disc support- Direct boot of Wii original and backup games from the same region
- Direct boot of Gamecube original and backup games from the same region
- Direct boot of different NTSC region Wii and GC games on USA and JAP consoles
- Partial region free support on Wii and GC original and backup games with different videomode (ie PAL<->USA, JAPAN)
- Improved readsettings for recordable media
- Supports running GC games at Wii diskspeed
- GC Audiostreaming Fix
- Supports full-size DVD and DVD9 discs for GC homebrew
- Supports GC multigame discs
- Supports Wii and GC multidisc games
True stealth mode- Does not modify RAM, making it virtually undetectable for the Wii
- Full command set emulation
Quality/Usability : For those who purchased a Nintendo Wii with a D2C chipset have been sitting at twiddling their thumbs waiting for a way to play homebrew and other games on their Nintendo Wii. Nintendo has revised the Wii to prevent modchips whether it be revising the motherboard, new chipset or cutting legs. But like all hackers/modders, they are reluctant to give up.
The D2CKey is the worlds first D2C modchip for the Nintendo Wii and the first to be able to bypass Super Mario Galaxy's encryption that prevented current modchips to not be able to play the game (WiiKey, CycloWiz and others have released upgraded firmwares to be able to play Super Mario Galaxy). D2CKey is brought to you by the same team who released the well known WiiKey.
D2CKey only and I mean only works on D2C Wii's. If you have a DMS, D2A or D2B, use the WiiKey. The WiiKey will not work on D2C Wii's, that is why there are two different modchips. If you dont know what chipset you have or if it has the cutlegs, you can find out by entering your Wii serial number into the WiiTracker database and it would give you an estimation of what is inside your console. You can also help out by adding your serial number along with origin, whether or not pins are cut, missing WiiKey solder pad #3, and if you're a modder/hobbyist or installer/repairer. This will help expand the database for those searching.
The D2CKey is built on a high quality PCB board with a Actel chip that powers it.
Installation : I wont go into detail on installation but let me start off by stating that the installation is NOT for the novice and should not be performed if you are a newbie or have little experience in soldering. I have no soldering skills so I had a friend who is experienced perform the installation on a recently purchased Wii. Reason for this is because installation requires 31 wires to be soldered. You can find installation guides at D2CKey's Resource page.
To enter region free compatibility, you will need to close the jumper(s) JP1 and/or JP2 on the D2CKey to match the region of your Wii. If you do not close JP1 or JP2, there will be no region override. Closing JP2 will patch PAL. Closing JP1 will patch USA (NTSC) and if both JP1 and JP2 are closed, this will patch Japan (NTSC).
Once installation is completed, whats different about the D2Ckey from the rest of the other modchips is that there is no need to set up, reflash, upgrade, or fiddle around. D2Ckey automatically detects what kind of disc is inserted, and configures the drive accordingly.
There are two LEDs on the D2CKey. This will inform you when discs are being read and detected. Of course, this is only visible when you still have the Wii disassembled. Once you close up your Nintendo Wii, you wont be able to see it unless you have the chip hanging on the outside.
Wii/GameCube Compatibility : All original Wii games booted up and flawlessly. Testing backups of the original games also resulted in a flawless boot up. Testing GameCube games posted the same result. But I noticed if you're switching from a GameCube game to a Nintendo Wii game, it sometimes would not work. This would require you to reset the Wii. Whats great for those playing GameCube games is that the GameCube audiostreaming fix is built-in.
Homebrew Compatibility : Unfortunately, I wasnt able to try the homebrew out.
Conclusion : Overall, D2CKey Wii Modchip (D2C only) is well built and works flawlessly. Considering its the first D2C modchip, its excellent. Great thing about it is no more set up discs. Just install and start using. No word on how the D2CKey would update if it was to be needed. Probably via DVD/CD like others. There is also no word on what future upgrade features we will see for the D2CKey.
Please note that none of the "upgrade" products listed in this site are endorsed by Nintendo, Sony and/or Microsoft. DCEmu Reviews and DCEmu Network does not condone piracy. The primary functions of a "modchip" and/or "flashcart" are to allow you to play imported games and homebrew software that you legally own or simply just for experimenting with hardware. We in no way endorse piracy, and encourage all users to do the right thing and support the developers/manufacturers that support them. We do not take any responsibilities for any use outside of these parameters or where the use of such a device is illegal.
Images via comments
To read more of the post and Download, click here!
 Join In and Discuss Here Join In and Discuss Here
Submit News and Releases Here and Contact Us for Reviews and Advertising Here |
|
 |
|
|
|
November 11th, 2007, 20:42 Posted By: Shadowblind
First off, let me tell you that I normally will raise the score because of combos in replay value. I'd normally do this because my personal tastes believe that when you have endless combos, that really enhances replay value. But for those whom combos do not help at all, I will set aside my feelings on this matter for now...
I'm not gonna lie. When I bought this game, I was desperate. Bored until Mass Effect arrived, and didn't want an overly gorey game (cough manhunt), I got Tales of the World and expected very little. What I got was a game brimming with polish and RPG elements that were enough at to make me instantly love this game (And I'm not that big an RPG fan either, fancy that.) The game begins in the land of Terresia, a land where man is the life force for all things. That mana has attracted a monstrous planet eater, the devourer, to it. You are a Descender, the planets last ditch effort to save itself. Immediately found by the Descender of another unfortunate planet, your quest begins to rid existance of the Devourer.
The character creator appears very simple at first, offering little in the way of clothing. Don't be fooled. Your clothes look like rags because every of the over 100 armors you can buy latch onto the character model, instead of raise defense without being seem. Helmets, boots, gloves, charms, all things have a model....and often a purpose.
Gameplay is the best aspect of it all. Fusing startegy from games like Final Fantasy and the physical real time combat of PSO and a small bit of Kingdom Hearts, Tales of the World has a combat system all its own. Quite difficult to explain, but let me put it this way: 360 degree fighting with 3 teamates and endless combos while controlling strategy for each and every character with special attacks and 7+ class groups?
HE** YEAH!
With all its great parts comes the bad as well. Your teamates.... well, they are never just smart. Sometimes they are brilliant and do things just like a player would and other times....your glad with they get knocked cold, one less thing to block your view. However, as far as RPGs go, I have yet to find one par with Tales. (Kingdom hearts rivals it, but doesn't have much in the way of strategy...)
Graphics are great for what they are. Character models show up fine, weapons, armor, all the items are inspired, but there are slowdowns during some of the more crazy battles. Not as bad as Final Fantasy Tactics, but, they get annoying. The levels (and this is where some of PSO's influence comes in) are pretty bear (Yes bear. Grizzly bears. No I just forgot how to spell it right.) But it doesnt matter so much as you never fight on the level itself but an arena when you meet an enemy.
Sounds is nice, but forgettable.
Anyyyyywayyy, heres a fine summary:
Presentation: 4.5/5
Great story, easy menus, even online trading. Still, the artes can get confusing at times.
Sound: 3.5/5
Like I said, its fine for what it is, but you won't be humming it inside your head.
Graphics: 4/5
Great character models brought down by moderately bland backgrounds.
Gameplay: 4.5/5
Like I said, I'm putting my love of all things combo behind me for this. Yet this game still shines even if they weren't there.
Replay Value: 4.5/5
Yeah that right. Its high as the you were last year at the Christmas party. Yeah you remember it. I've logged 25 hours and have only done 27.6% of all quests, meager as they may be. Collecting items, armor, going on training excursions....good fun. Good fun.
Overall:

A must have for all RPG lovers out there. A thing you SHOULD have for everyone else.
THE MINIVIEW HAS SPOKEN!
To read more of the post and Download, click here!
 Join In and Discuss Here Join In and Discuss Here
Submit News and Releases Here and Contact Us for Reviews and Advertising Here |
|
 |
|
|
|
November 10th, 2007, 07:41 Posted By: bandit
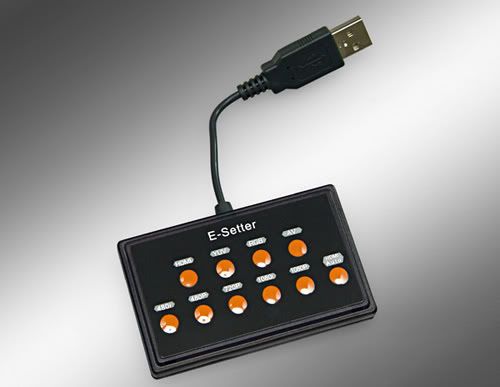
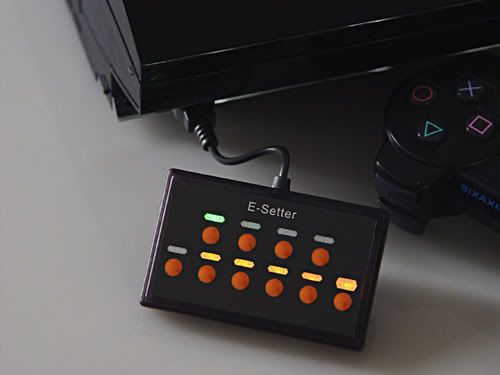
The e-setter is a device for people who can easy set up their TV screen for the PS3 gaming consoles. People who have 2 or more TVs at home wanting to move the PS3 to play on another TV, may find that there is no picture display after moving because the output resolution is different on each TV. They would have to set the PS3 back to original setting on their current TV before move to another TV. Setting the output of PS3 is complicated, and takes up to half hour to do so.
The e-setter is a device for users to set up the output resolution easily, switch a buttons and get set up in a few seconds.
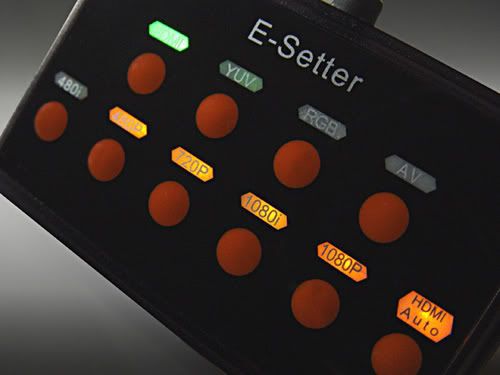
Function and features:- Resolution output keys- pre-set for 480i ,480P, 720P, 1080i ,1080P and HDMI Auto
- Output selection including: HDMI, YUV, RGB, AV
- USB plug and play
- Can reset screen picture when no picture is available
- Support hardware upgrade , support different versions of consoles
It will cost approximately $30.00 but Play-Asia is selling it for $24.90.
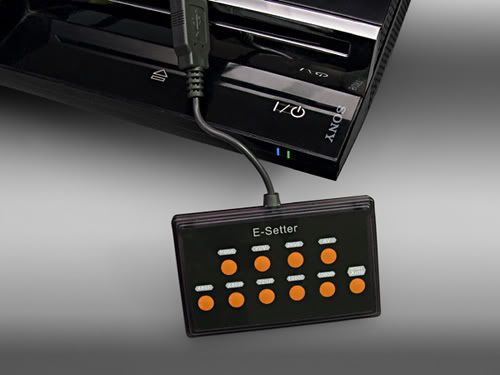
Here is a video of how to connect the e-setter to the PlayStation3
To read more of the post and Download, click here!
 Join In and Discuss Here Join In and Discuss Here
Submit News and Releases Here and Contact Us for Reviews and Advertising Here |
|
 |
|
|
|
November 10th, 2007, 07:15 Posted By: bandit

The latest edition of Hong Kong based lifestyle magazine Milk, is accompanied by special Nike x Milk PSP and Nintendo DS cases in a brown and pink, respectively. In order to obtain one of these, you must purchase this weeks Milk Magazine Issue #329.
Source: Milk via HIGHSNOBIETY
To read more of the post and Download, click here!
 Join In and Discuss Here Join In and Discuss Here
Submit News and Releases Here and Contact Us for Reviews and Advertising Here |
|
 |
|
|
|
November 4th, 2007, 22:17 Posted By: bandit
Neuros OSD Linux Media Recorder
Manufacturer: Neuros Technology
Site: Buy from Amazon.com
Price: $229.99

Overview : The Neuros OSD allows you to store and access all your video when, where, and how you want. It connects right to your TV and allows you to record from any video source that uses the familiar red, white and yellow RCA jacks.
With the Neuros OSD, you avoid proprietary lock-in by creating standard format MP4 files that you can play back virtually anywhere (on your TV via the OSD or directly on PCs and portable devices like the iPod™, iPhone™, PSP™ and Blackberry™). Likewise, the Neuros OSD allows you to record directly to whatever storage you want. Typically, this means attaching a USB external hard drive (not included), but recording is also supported over a home network directly to your PC's hard drive, as well as to network attached storage drives and memory cards. Once recorded, you can easily transfer to portables and watch on the go or anywhere.
Specifications :
Video Standard- Compatible with NTSC, Pal and Secam (input only) standards
Video Recording- ISO Standard MPEG-4 SP encoding (MP4, ASF)
- QVGA (320x240) @30fps with AAC-LC/MP3/G.726 audio for smartphones, PSP™, iPod™, iPhone™ and PDA’s.
- VGA setting (640x480) @30fps for PC, TV playback.
Video Player- MPEG-4 SP with MP3 audio, 30fps up to D1 resolution (720x480)
- Quicktime 6
- MPEG-4 AAC-LC stereo
- MP4 format at up to D1 resolution
- H.263 with MP3 audio
- FLV (for Playback of YouTube videos)
- ASF
- AVI (including Divx and Xvid)
- MP4
- WMV (up to QVGA)
- MOV
- MPG
- MPEG
YouTube browser- Watch YouTube videos on your TV
- Search the entire Youtube library using keywords
- build a list with all your favorite videos
Photo Viewer- JPEG decoder (baseline up to 32M pixel)
- BMP
- GIF (nonanimated)
- Thumbnail view
- Zoom in/out (2x, 4x)
Audio Player- Stereo MP3/WMA @ 30-320kbps (CBR & VBR)
- Ogg Vorbis
- FLAC
- WAV
- Stereo MPEG-4 AAC-LC
- G.726
Features- Schedule (timer) recording
- Customizable slide shows
- One-click record
- IR Blaster to control your set-top box
- Run 3rd party applications
USB Host- Record to and playback content from any USB mass storage device
Ethernet- Connect to your network
- Save recordings to network storage
- UPnP support
- Stream Audio/Video from Internet
- Download multimedia content from Internet
- Connect to Windows Networks (Samba client support)
Complete System Includes- Standard A/V RCA Interface Cables (European units also contain SCART adapters)
- 110-240V AC/DC Power Supply
- Stand
- IR Blaster
- Remote Control
- Abbreviated Users Manual
Dimensions and Weight- 14 x 14 x 3.2 cm (5.5 x 5.5 x 1.25 inches)
- Weight 230g (8oz)
UpgradeabilityStorage Card Compatibility- Memory Stick: Duo and Pro Duo
- Compact Flash: Type I and Type II
- Microdrives with CF type II interface
- Secure Digital (SD)
- Multi Media Card (MMC)
- USB thumbdrives
- External Hard Drives
Quality/Usability : The Neuros OSD is a fascinating Linux powered piece of hardware. When I first saw images of the Neuros OSD, I thought the device would be fairly big. After receiving the Neuros OSD, I was fooled and tricked. The size is fairly small. The UI is not bad as its basic and to the point.
Setting up the Neuros OSD is as simple as it can get if you know how to hook up electronics such as DVD/VCR, computers or just even your video game consoles. Its pretty much self explanatory. There are even text to help you in case some ports look the same.
Those who have a network setup, hooking the Neuros OSD is fairly easy as well. Simply plug in cat5 cable and OSD will automatically configure itself according to your DHCP server. If you have a static IP, there is a devoted menu setting so you can set this up but may take a little longer to get it running.
Recording Video : OSD allows you to record and schedule recordings. To save your recordings, you'll need either a USB storage device, network or memory card. Unfortunately, there is no harddrive. Would have been nice if one was included.
Pressing the red "RECORD" button on the remote will present you with a menu as to where you would like to record to. Once you have chosen the destination, press the "ENTER" button and the recording will begin.
Scheduling a recording is a nice feature. The OSd a feature called IR Blaster. The IR Blaster changes the channel! For example, you want to schedule the OSD to record your favorite show at 8pm and then record another show at 9pm on a different channel, the IR Blaster will automatically change the channel on your cable box and will record both shows. At the scheduled time, OSD will automatically start recording to whatever destination you chose to save to.
Once finished recording, you can transfer the files to your PSP, iPod or other devices that support the format. The quality is not the greatest and you wont get HD quality, but it is enough to keep you happy.
Video Playback : You can choose playback from different sources such as SD, microdrives, compactflash, thumbdrives, etc. Once you have chosen the file you want to play, Neuros OSD will automatically playback the file. It can playback files such as MP4, WMV, ASF, Quicktime, FLV and many more.
There were some sync issues but this was probably due to the high bitrate. This can be fixed either with a slightly lower bitrate but this can also be due to the lack of memory on the Neuros OSD.
Audio Playback : Neuros OSD not only lets you playback video but it lets you play audio files as well. MP3 was only tested for this review and I did not notice any distortion during audio playback. It can also play back wma, ogg, aac, g.726, wav and flac. You can shuffle songs and build playlists.
Neuros OSD is capable of being a picture viewer by decoding bmp, jpeg and gif (non-animated).
Since the Neuros OSD is open source, there are communities that develop for such devices. So you can add third party applications to the Neuros OSD. Great thing about this is that Neuros listens and works closely with the community to help improve and add features. You can visit Neuros' community whether you're a developer, user or just want to provide feedback simply by going here.
Conclusion : Overall, the Neuros OSD Linux Media Recorder is a great piece of hardware. Some of its biggest features is open source, no DRM, the ability to do what you want to do and being able to save to whatever format you want such as thumb drives, SD, memory cards and even external hard drives! If there is ever a problem or a bug, it can be easily fixed or "squashed" since OSD is open source. The settings allows you to configure how you want to record your files such as such as playback device, resolution, where to save to, framerate, video bitrate, audio format and audio bitrate. The ideas, support are endless with the support of developers and from the community. This is what makes the product great rather than be locked in to the limited functions. However, the price range may scare some people but for a open source devices that lets you use any media format and the ability to playback and ability to schedule record...you cant go wrong.
Images via comments
To read more of the post and Download, click here!
 Join In and Discuss Here Join In and Discuss Here
Submit News and Releases Here and Contact Us for Reviews and Advertising Here |
|
 |
|
|
|
November 4th, 2007, 19:10 Posted By: bandit
Talismoon TiltBoard Controller Mod
Manufacturer: Talismoon
Site: Buy from Divineo US / Buy from Divineo China
Price: $35.99
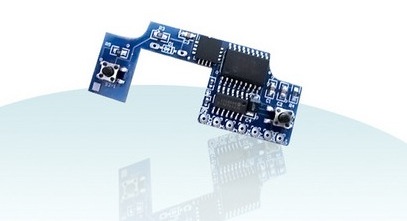
Overview : At long last it’s time for Xbox 360™ owners to feel the benefits of tilt sensation, something of which PS3™ owners have been privileged to since its inception. Moreover, the Nintendo Wii™ is a prime example of just how instrumental interactive controllers can be in providing a highly enjoyable gaming experience.
Talismoon’s Tiltboard sports a unique u-shaped board that puts the two Tiltboard control buttons within easy reach of gamers fingers, with one button conveniently located on either wide of the wireless controller battery pack. This gives gamers the ability to make on the fly tilt adjustments during a game without even stopping. This comes in particularly handy for instances in games when it is necessary to switch between both stick and tilt control.
The Tiltboard is an intelligent piece of kit and comes pre-loaded with TiltTune™ technology which is the most user friendly firmware available for such a device. Gamers have the option to adjust the tilt sensitivity, adjust the 0 degree in order to hold the controller at the most comfortable angle, invert the Y axis and turn the tilt function on and off. Everything required to enjoy the latest sensation in console gaming on Xbox 360™ comes in a convenient package and requires only seven wires to solder.
Features :- Custom Fit Design
- 2 multifunction buttons within easy reach
- Requires soldering 7 wires
- "Best practice" install method eliminates control loss as controller battery life weakens
- Persistent memory keeps your TiltTune settings even if there is no power to your controller.
- The new tiltBoard comes preloaded with tiltTune technology (TM), the most user friendly firmware available, including:
- Adjust tilt sensitivity
- Adjust the 0 degree so that you can hold the controller at whatever angle is natural for you
- Invert the Y axis (independently for either the stick or the tilt)
- Turn the tilt on and off (switch between stick and tilt)
Quality/Usability : The Xbox 360 was the first next-gen console out of the gate..a year before the Nintendo Wii and Sony PlayStation3. With both next-gen consoles having motion sensing controllers except for the Xbox 360, Microsoft has not addressed this issue but 3rd party peripheral manufacturers have and have stepped up to fill in the void.
TiltBoard first started off as just a mod by Adam Thole (http://www.adamthole.com). Once word spread like wildfire that there was a motion sensing mod for the Xbox 360, modders and gamers wanted to know how to make one or buy one. With the huge interest in the mod, Adam Hole offered the TiltBoard for a price but only limited quantities. Adam Thole then put up instructions on how to make you own TiltBoard with diagrams. The original TiltBoard was on a rectangular PCB board.
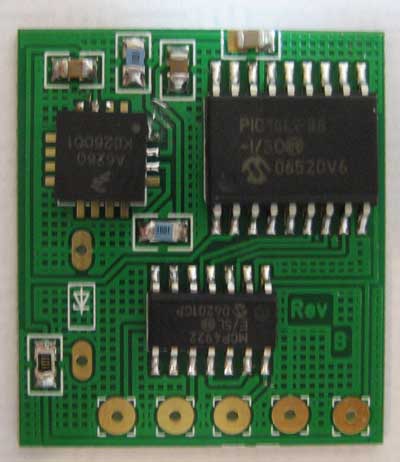
With a high demand and Adam having to solder each TiltBoard himself, he negotiated a deal with a well-known specialist peripheral maker, Talismoon. With this deal, Adam will not have to solder each himself, new compact design, professional looking and packaging. As a result of this collaboration, this is the end result that you will receive...

Performing this modification will require some soldering experience. If you do not have any experience with using a soldering iron, its best to have someone who does help you. That is of course, unless you dont care on spending additional money on another controller if you mess up. Hey, at least its a $50 or so controller rather then a $400 system.
The TiltBoard requires you to solder 7 wires on to the Xbox 360 PCB board on the controller and drilling two holes to the Xbox 360 back controller cover. I wont go into the full details of installing as it is fairly long but for instructions on how to install the TiltBoard, you can get them directly from Talismoon's website. You can also get the operating instructions here.
After installation has been completed, its time to give it a test run. Accessing the two buttons on the back of the controller is fairly easy. The button on the left side (viewing back) allowed us to toggle between tilt mode and non-tilt mode simply by pressing the button (quick press). This is great since not all games will require the tilt function. When the tilt function is enabled, the analog sticks with not work.
Holding the button down (1 second) will invert the Y axis. So if you tilt the controller down, you will go up. However, inverting the tilt will not affect the stick control.
The button on the other side (right side) allows you to set the tilt sensitivity by pressing the button once. To use this feature, tilt the controller to the position that you want to be the "maximum" setting for full tilt. This allows you to set how sensitive you want the controllers to be. The sensitivity is set on box axis and is separate, so you can set a wide sensitivity for turning right and left but a narrow sensitivity for moving up and down.
Holding the button down for 1 second sets the controller in RELAXED MODE. By default, the controller must be held perfectly flat and level for your object to go straight towards the "horizon" in the game. There are times where you dont want to hold the controller flat to go straight. An example would be if you were to lean back and relax in your chair. Sitting straight up or standing, our hands are usually the same level as our stomach. But when you're sitting back relaxing, holding the controller flat would be uncomfortable while sitting and us gamers have a tendency of slightly tilting the controller up especially with our arms on the armrest. With our arms on the armrest, our controllers are no longer the same level as our stomach but now with our chest. So with the RELAXED MODE set, you will not have to keep the controller flat with your wrist bent but slightly tilted up and your wrist straight and your object will still go straight.
You can view a videos of TiltBoard demonstation and in action:
TiltBoard Demonstration:
Conclusion : Overall, the Talismoon TiltBoard Controller Mod is a great controller mod. The TiltBoard allowed on the fly adjustments by simply pressing or holding the two buttons on the back of the controller. The different settings that can be applied makes gaming easy. The Tiltboard also came with a drill bit to drill holes for the buttons. If they didnt come with that, people would either have too small or too big of a hole. It would of been nice if they included a template of some sort as to where to drill the holes.
Images via comments
To read more of the post and Download, click here!
 Join In and Discuss Here Join In and Discuss Here
Submit News and Releases Here and Contact Us for Reviews and Advertising Here |
|
 |
|
|
« prev
77
78
79
80
81
82
83
84
85
86
87
88
89
90
91
92
93
94
95
96
97
next »

|
|
|


